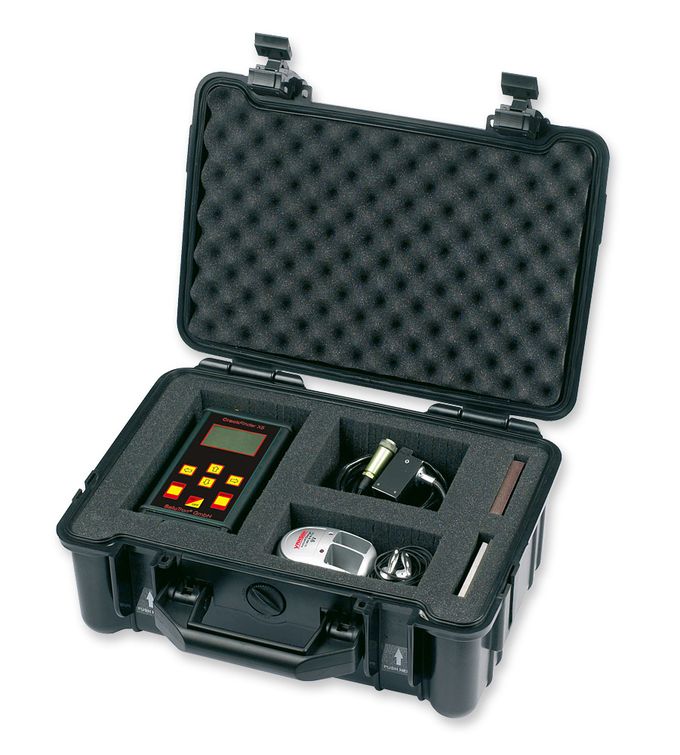
Crack measuring gauge
CrackFinder® X5
Crack search and measurement
By manually scanning with the sensor of the CrackFinder® X5, it accurately finds cracks on all aluminium and ferromagnetic materials such as steel piping, steel pressure tanks, steel boilers, steel constructions, etc.
This gauge does not only detect cracks in material under inspection in no time at all, but it can also measure and determine the depth of the crack through a 3 - 4 mm thick insulating layer (only for steel)!
Cracks can also be located and traced through a corrosion or paint layer of up to a max. thickness of 10 mm, and the crack does not need to be linked to the surface of the test piece as is required for the dye penetration technique.
The innovative measuring technique employed, is an indispensable aid for preventive maintenance and production processes, enabling the user to pinpoint cracks with ease and speed which in turn saves the user time and great costs from possible accidents occurring. The X5 has a wide range of application in the petro-chemical industry, chemical industry, gas industry, power generation industry, undercarriage industry, for general inspections on heavy machinery, etc.
Measuring principle
The CrackFinder® X5 operates according to the magnetic and eddy-current principle so that cracks in materials can be determined accurately, and their depth and extension (max. 5 mm) can be measured precisely.
The measured values are directly displayed on the LCD monitor. The display can be illuminated for operation in dark surroundings. Furthermore, this instrument can be used under extreme working temperatures (-15°C to +40°C) in nearly all countries of the world. This instrument is also suitable for measuring the thickness of paint and/or corrosion coatings.
Easy calibration functions ensure that material influences and sensor tolerances are largely compensated for by this intelligent instrument.
An appropriate calibration block with a reference crack (crack depth 2 mm) to test and calibrate the instrument incl. sensor are part of the scope of delivery. The instrument only needs to be re-calibrated if it shows an incorrect value on the display with reference to the test specimen.
Characteristics and equipment
- Application for crack detection on tubes, pipelines, boilers, constructions, wheels-rims, containers, etc. from steel or aluminium
- Crack localisation and reliable measurement of crack depth
- Crack detection not influenced by corrosion, paint and/or insulating layers of up to a maximum of 10 mm
- Fast, safe and problem-free crack detection with intelligent technology.
- High cost reduction due to timely repair potential
- Suitable for finding hair-line cracks and determining metal fatigue
- No need for consumables, such as couplants, dye-penetrants, etc.
- Quick amortisation of purchase price when used to conduct preventative maintenance
Application
- Search for cracks, crack-identification and quantification on pipes, pipelines, boilers, structures, wheels, tanks, pressure vessels, etc. made of steel or aluminum
- Mainly used in preventive maintenance and in production processes in the petrochemical industry, gas industry, power industry, chemical industry, during inspections and in heavy machinery among otrhers.
Standard delivery range
- The CrackFinder® X5 gauge
- Sensor with cable
- 9V battery (6F22)
- Battery charger
- Connection cable for charger
- Headphones
- Connection cable for headphones
- Crack calibration specimen: steel with
- 2 mm crack depth
- Calibration specimen made from plastic,
- 2 mm thickness
- High-impact service case which is dust proof, and water-proof up to a depth of 5-metres
- Universal service bag with carry strap and front pocket
Downloads
Specifications
All SaluTron® gauges correspond to national (DIN) and international (ISO, BS, ASTM) norms and possess the CE-sign.
Specifications are subject to change without prior notice.
| Crack search and localisation | on steel and aluminium parts. also cast steel. grey cast iron and Nodular cast iron. |
| Min. depth of cracks to be tested | from 0.3 mm to 0.5 mm |
| Min. width of cracks to be tested | 0.05 mm |
| Min. length of cracks to be tested | 5 mm |
| Measuring range for crack depth measurement | from 0.3 mm to 5 mm |
| Measuring error in crack depth measurement | 0.2 + 0.1 h mm, h = crack depth |
| Measuring range for coating thickness measurement | from 0 to 6 mm |
| Measuring precision for coating thickness measurement | 5 % |
| Recognition of cracks under a paint and/or corrosion or insulating layer | up to 10 mm coating thickness |
| Power supply | 9V battery (6F22) alkaline |
| Operating time | 10 hours - permanent battery condition display |
| Operating temperature | -15°C to +40°C |
| Gauge dimensions (L x W x H) | 150 x 80 x 35 mm |
| Sensor dimensions | 24 x 24 x 48 mm |
| Sensor cable length | 1.5 m |
| Weight (incl. sensor) | 0.5 kg |
| Weight with case | 3 kg |

